GridControl控件的数据显示的样式控制
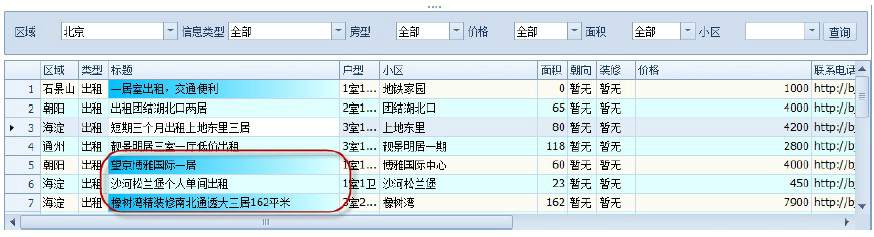
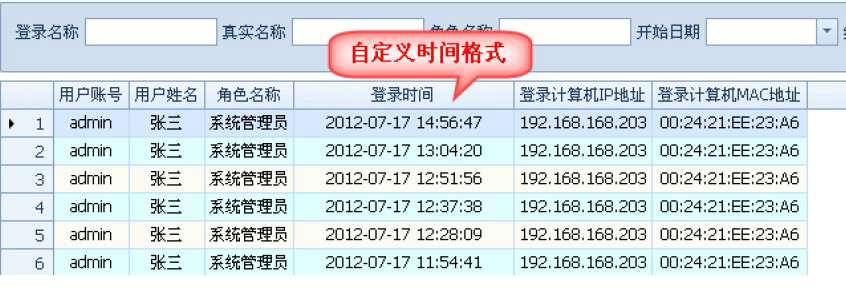
如上两图所示,Dev列表控件GridControl默认的格式并没有渐变变色效果,显示的日期数据,也是“yyyy-MM-dd”的格式,而非“yyyy-MM-dd HH:mm:ss”即使对于后面有长格式的日期数据也一样。下面分别对这两种情况进行说明。
如上两图所示,我们有时候需要控制列表访问过的颜色变化,或者是时间显示格式等内容,这个时候设置GridView的RowCellStyle即可实现,如下所示。
this.gridView1.RowCellStyle += new DevExpress.XtraGrid.Views.Grid.RowCellStyleEventHandler(gridView1_RowCellStyle);
void gridView1_RowCellStyle(object sender, DevExpress.XtraGrid.Views.Grid.RowCellStyleEventArgs e)
{
if (e.Column.FieldName == "PublishType")
{
if (e.CellValue != null && e.CellValue.ToString() == "中介")
{
e.Appearance.BackColor = Color.DeepSkyBlue;
e.Appearance.BackColor2 = Color.LightCyan;
}
}
if (e.Column.FieldName == "PublishTime")
{
e.Column.DisplayFormat.FormatString = "yyyy-MM-dd HH:mm:ss";
}
if (e.Column.FieldName == "Title")
{
string id = this.winGridViewPager1.gridView1.GetRowCellDisplayText(e.RowHandle, "Id");
if (historyDict.ContainsKey(id))
{
e.Appearance.BackColor = Color.DeepSkyBlue;
e.Appearance.BackColor2 = Color.LightCyan;
}
}
}
对于日期格式,如果需要列表中的日期小于某个值(如1900-1-1)的时候,就设置为空,那么可以通过下面的方法进行设置即可解决。
this.winGridViewPager1.gridView1.CustomColumnDisplayText += new DevExpress.XtraGrid.Views.Base.CustomColumnDisplayTextEventHandler(gridView1_CustomColumnDisplayText);
void gridView1_CustomColumnDisplayText(object sender, DevExpress.XtraGrid.Views.Base.CustomColumnDisplayTextEventArgs e)
{
if (e.Column.ColumnType == typeof(DateTime))
{
string columnName = e.Column.FieldName;
if (e.Value != null && Convert.ToDateTime(e.Value) <=
Convert.ToDateTime("1900-1-1"))
{
e.DisplayText = "";
}
}
}
GridControl中的GridView内容打印
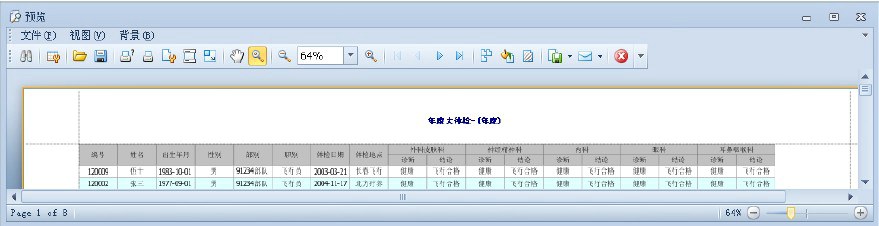
由于GridView的良好封装性,实现打印的代码很简单。
private void menu_Print_Click(object sender, EventArgs e)
{
PrintableComponentLink link = new PrintableComponentLink(new PrintingSystem());
link.Component = this.gridControl1;
link.Landscape = true;
link.PaperKind = System.Drawing.Printing.PaperKind.A3;
link.CreateMarginalHeaderArea += new
CreateAreaEventHandler(Link_CreateMarginalHeaderArea);
link.CreateDocument();
link.ShowPreview();
}
private void Link_CreateMarginalHeaderArea(object sender, CreateAreaEventArgs e)
{
string title = string.Format("年度大体检-({0}年度)", this.txtYear.Text);
PageInfoBrick brick = e.Graph.DrawPageInfo(PageInfo.None, title, Color.DarkBlue,
new RectangleF(0, 0, 100, 21), BorderSide.None);
brick.LineAlignment = BrickAlignment.Center;
brick.Alignment = BrickAlignment.Center;
brick.AutoWidth = true;
brick.Font = new System.Drawing.Font("宋体", 11f, FontStyle.Bold);
}
设置GridView的行指示器(行头)显示行号

在我的分页控件以及Winform开发框架很多项目介绍里面,很多都显示了行号,其实这个在DevExpress中的实现很简单,如果需要,可以实现在自己的代码里面。
1) 先实现GridView的CustomDrawRowIndicator事件,实现代码如下所示。
private void advBandedGridView1_CustomDrawRowIndicator(object sender,
DevExpress.XtraGrid.Views.Grid.RowIndicatorCustomDrawEventArgs e)
{
e.Appearance.TextOptions.HAlignment = DevExpress.Utils.HorzAlignment.Far;
if (e.Info.IsRowIndicator)
{
if (e.RowHandle >= 0)
{
e.Info.DisplayText = (e.RowHandle + 1).ToString();
}
else if (e.RowHandle < 0 && e.RowHandle > -1000)
{
e.Info.Appearance.BackColor = System.Drawing.Color.AntiqueWhite;
e.Info.DisplayText = "G" + e.RowHandle.ToString();
}
}
}
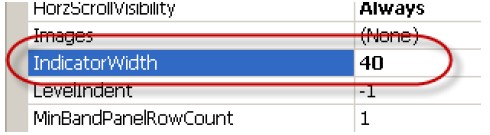
2) 然后设置GridView控件的IndicatorWidth为合适的宽度,如40左右则比较好。
3) 这样设置后,就能顺利显示行号了,是不是很方便呢。p